-
Tuist의 Configuration 설정하기Tuist 2023. 5. 18. 14:06
안녕하세요. 그린입니다🍏
이번 포스팅에서는 Tuist의 Configuration을 알아보고 각 개발 환경을 분리하여 설정해보도록 하겠습니다🙌
들어가기 전 필요 개발 환경 체크
기본적으로 프로젝트는 DEBUG와 RELEASE의 flag 즉, build configuration을 가지게 되는데요.
각자 만들고 있는 프로젝트의 성향에 따라 다르겠지만 여기서 QA configuration도 추가하여 사용될 수 있습니다.
실제 저는 총 3개의 configuration을 설정하는데요.
하나는 내부 개발의 배포를 위한 DEV, 또 하나는 실제 프로덕트 출시 전 QA를 위한 QA, 마지막으로 실제 상용 배포를 위한 RELEASE로 나눌 수 있습니다.
자, 그럼 이 3개의 configuration을 Tuist를 통해 어떻게 각 배포 환경을 줄 수 있는지 같이 해보시죠🕺🏻
Tuist를 통해 Configuration 설정하기
먼저 앱을 구성하는 모듈이 되는 프로젝트 타겟 설정에서 아래와 같이 QA / DEBUG / RELASE의 configuration을 설정해줍니다.
let project = Project.make(
  name: "GREENUI",
  targets: [
    .make(
      name: "GREENUI",
      product: .framework,
      bundleId: "com.green.GREENUI",
      sources: ["Sources/**"],
      resources: ["Resources//**"],
      dependencies: [
      ]
    )
  ],
  // 요 부분에서 설정
  settings: .settings(
    configurations: [
      .debug(name: .debug),
      .debug(name: "QA"),
      .release(name: .release)
    ]
  )
)
기본적으로 debug와 release는 제공되지만 QA / STAGE / DEV와 같이 이 외 별도로 필요한 빌드 설정은 직접 넣어줍니다.
그 다음으로 실제 총 관여할 앱 프로젝트에서 configuration을 주기전 Dependency에서도 설정이 필요하기에 한번 해볼까요?
만약 외부 라이브러리를 사용하고 있다면 Dependecies 파일에서도 configuration을 설정해줘야 합니다.
그 이유는 외부 라이브러리들은 기본적으로 DEBUG / RELEASE의 configuration만 설정되어 있기에 실제 QA configuration을 부여해주지 않으면 아래와 같이 해당 라이브러리가 가진 configuration은 DEBUG / RELASE인데 우리 앱 프로젝트에서는 QA까지 총 3개를 사용하고 있어 미스매칭이 되고 있다는 오류가 납니다.
Warning: The project 'Get' has missing or mismatching configurations. It has [Debug (debug), Release (release)], other projects have [DEBUG(debug), QA(debug), RELEASE(release)]그렇기에 이 설정도 아래와 같이 해줘야 해요!
import ProjectDescription
import ProjectDescriptionHelpers

let dependencies = Dependencies(
  swiftPackageManager: SwiftPackageManagerDependencies(
    [
      ...
      .remote(
        url: "https://github.com/firebase/firebase-ios-sdk.git",
        requirement: .exact("10.0.0")
      ),
      .remote(
        url: "https://github.com/airbnb/lottie-spm.git",
        requirement: .exact("4.1.3")
      ),
      .remote(
        url: "https://github.com/AppsFlyerSDK/AppsFlyerFramework.git",
        requirement: .exact("6.5.0")
      ),
      .remote(
        url: "https://github.com/kean/Get.git",
        requirement: .exact("2.1.1")
      ),
      ...
    ],
    // 요 부분에서 마찬가지로 설정
    baseSettings: .settings(
      configurations: [
        .debug(name: .debug),
        .debug(name: "QA"),
        .release(name: .release)
      ]
    )
  ),
  platforms: [.iOS]
)
SPM의 baseSettings 옵션을 활용해 동일하게 configuration을 설정해줍니다.
마지막으로 최종적인 앱의 프로젝트 파일을 건드려 볼까요?
아래와 같이 Project 파일을 실제 배포환경에 맞게 Dev / QA / PROD로 구성할 수 있습니다.
let project = Project.make(
  name: "GREENAPP",
  targets: [

    // QA 타겟
    .make(
      name: "QA-GREENAPP",
      product: .app,
      bundleId: "com.green.qa",
      infoPlist: .file(path: .relativeToRoot("GREENAPP/Info.plist")),
      sources: ["Sources/**"],
      entitlements: .relativeToRoot("GREENAPP/Resources/QA/GREENAPP.entitlements"),
      dependencies: [
      ],
      settings: .settings(
        configurations: [
          .debug(name: "QA", xcconfig: "./xcconfigs/green.qa.xcconfig")
        ]
      )
    )

    // DEV 타겟
    .make(
      name: "DEV-GREENAPP",
      product: .app,
      bundleId: "com.green.dev",
      infoPlist: .file(path: .relativeToRoot("GREENAPP/Info.plist")),
      sources: ["Sources/**"],
      entitlements: .relativeToRoot("GREENAPP/Resources/DEV/GREENAPP.entitlements"),
      dependencies: [
      ],
      settings: .settings(
        configurations: [
          .debug(name: .debug, xcconfig: "./xcconfigs/green.dev.xcconfig")
        ]
      )
    )

    // PROD 타겟
    .make(
      name: "PROD-GREENAPP",
      product: .app,
      bundleId: "com.green.prod",
      infoPlist: .file(path: .relativeToRoot("GREENAPP/Info.plist")),
      sources: ["Sources/**"],
      entitlements: .relativeToRoot("GREENAPP/Resources/PROD/GREENAPP.entitlements"),
      dependencies: [
      ],
      settings: .settings(
        configurations: [
          .debug(name: .release, xcconfig: "./xcconfigs/green.prod.xcconfig")
        ]
      )
    )
  ],

  // 해당 Project configuration 설정
  settings: .settings(
    configurations: [
      .debug(name: .debug),
      .debug(name: "QA"),
      .release(name: .release)
    ]
  ),
  additionalFiles: [
    "./xcconfigs/green.shared.xcconfig"
  ]
)
이런식으로 각 배포환경에 맞게 타겟을 분리하고 해당 타겟에서 사용할 수 있는 configuration을 담아줍니다.
그리고 해당 프로젝트 전체적으로 configuration을 Debug / QA / Release를 구성해주면 됩니다.
여기서 마지막으로 짚어보면서 설정해야할 부분이 있어요🙋🏻
바로 xcconfig 부분입니다.실제 xcconfig 파일은 해당 프로젝트 내 경로에 만들어주고 각 qa / dev / prod로 분리하여 configuration 별로 해당하는 빌드 설정을 해주는 용도로 사용됩니다.
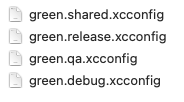
즉, 아래와 같이 우선적으로 xcconfig 파일을 만듭니다.

여기서 shared.xcconfig 파일에는 releas/qa/dev 공통적으로 들어갈 설정을 넣어줍니다.
MARKETING_VERSION=2.3.0
CURRENT_PROJECT_VERSION=135
DEVELOPMENT_TEAM=BLABLA
마켓팅 버전 및 빌드 넘버 그리고 해당 앱의 개발팀 ID 값이 들어갈 수 있겠죠?
그 다음으로 각 release/qa/debug에 각자 configuration 설정을 위해 아래와 같은 코드를 매칭하여 추가해줍니다.
#include "./green.shared.xcconfig"

// dev.xcconfig에서 추가
OTHER_SWIFT_FLAGS[config=DEBUG][sdk=*] = $(inherited) -DDEBUG

// qa.xcconfig에서 추가
OTHER_SWIFT_FLAGS[config=QA][sdk=*] = $(inherited) -DQA

// prod.xcconfig에서 추가
OTHER_SWIFT_FLAGS[config=RELEASE][sdk=*] = $(inherited) -DRELEASE
각 배포 환경별로 Swift Flag를 심어주는 역할을 해줍니다.
그럼 이제 모든게 끝났습니다!
실제로 하나 더 나아가서 Workspace를 만들때 Dev / QA / Prod configuration으로 스킴을 분리하고 사용할 수 있음으로 아래와 같이 Workspace 설정을 구현해줍니다.
import ProjectDescription

let workspace = Workspace(
  name: "GREEN",
  projects: [
    "GREENAPP",
    "GREENUI",
  ],
  schemes: [
    Scheme(
      name: "Prod-GREEN",
      buildAction: .buildAction(targets: [.project(path: "./GREENAPP", target: "Prod-GREENAPP")]),
      runAction: .runAction(configuration: .release),
      archiveAction: .archiveAction(configuration: .release),
      profileAction: .profileAction(configuration: .release),
      analyzeAction: .analyzeAction(configuration: .release)
    ),
    Scheme(
      name: "Dev-GREEN",
      buildAction: .buildAction(targets: [.project(path: "./GREENAPP", target: "Dev-GREENAPP")]),
      runAction: .runAction(configuration: .debug),
      archiveAction: .archiveAction(configuration: .debug),
      profileAction: .profileAction(configuration: .debug),
      analyzeAction: .analyzeAction(configuration: .debug)
    ),
    Scheme(
      name: "QA-GREEN",
      buildAction: .buildAction(targets: [.project(path: "./GREENAPP", target: "QA-GREENAPP")]),
      runAction: .runAction(configuration: "QA"),
      archiveAction: .archiveAction(configuration: "QA"),
      profileAction: .profileAction(configuration: "QA"),
      analyzeAction: .analyzeAction(configuration: "QA")
    ),
  ],
  generationOptions: .options(autogeneratedWorkspaceSchemes: .disabled)
)
요렇게 흐름순으로 구성을 해준다면 실제 스킴별로 테스트 및 배포를 보다 수월하게 할 수 있게 되며 목적에 따라 분리가 명확해집니다😃
마무리
각 배포 환경별 빌드 설정은 프로덕트를 만들다 보면 꼭 필요한 부분인데 이또한 Tuist를 통해 아주 쉽게 설정할 수 있는걸 알아본 좋은 경험이였습니다🙌
'Tuist' 카테고리의 다른 글
What's new in Tuist v4 (73) 2024.07.04 Tuist v4 설치 및 사용 (with. 자동화) (64) 2024.07.01 Multiple commands 에러 바로잡기 (feat. GoogleService-Info.plist) (8) 2023.05.04 Tuist에서 Firebase Crashlytics 설정하기 (15) 2023.04.27 Tuist를 통해 SwiftLint 사용하기 (10) 2023.04.25